If you want to outmaneuver competitors in Google Shopping, you need more than just a good product feed - you need smart segmentation.
After running campaigns for eCommerce brands of all sizes, I can tell you: custom labels are the secret weapon most marketers overlook.
Custom labels are those five flexible fields in Google Merchant Center that let you slice and dice your product catalog any way you want.
They’re not just “extra fields”—they’re your ticket to sharper bidding, cleaner reporting, and campaign structures that actually make sense.
Let’s break down what custom labels are, how they work, and the real-world tactics that drive results.
What Are Custom Labels in Google Shopping?
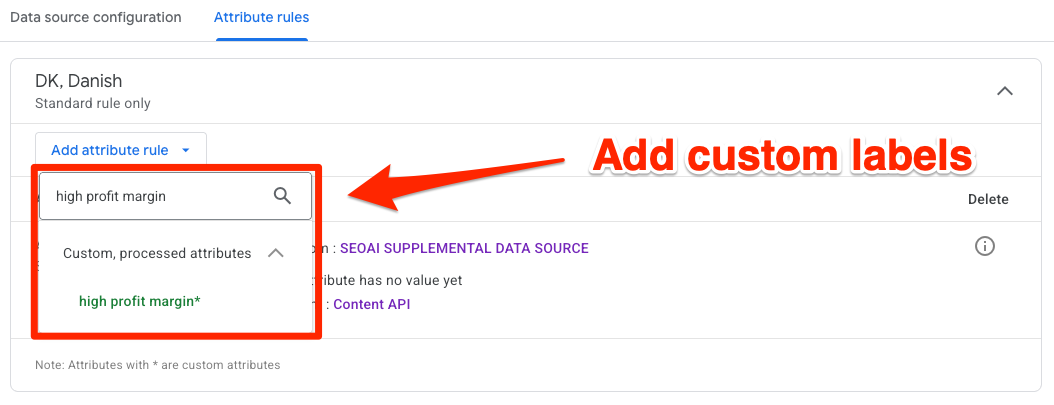
Custom labels are user-defined attributes in your Google Merchant Center feed. You get five: custom_label_ through custom_label_4. Each one is a blank slate. You decide what they mean—season, margin, price tier, bestseller status, whatever matters to your business.
How do you add them?
- Use a feed management tool (like DataFeedWatch or Feedonomics) for automation.
- Or, add them manually in Merchant Center if your catalog is small.
Why bother?
Because these labels let you group products for bidding and reporting in ways that default attributes (like brand or category) never could.
How Custom Labels Actually Work
Here’s the workflow:
- You assign logic or rules to fill custom labels (e.g., “custom_label_ = high_margin” for profitable items).
- In Google Ads, you segment campaigns or ad groups using these labels.
- Now you can analyze, bid, and budget at a much more granular level.
Custom labels don’t change your product titles or descriptions—they’re invisible to shoppers. They’re just for you and your campaigns.
Why Custom Labels Matter
Without segmentation, your Shopping feed is just a big, messy list. I used to rely on brand or product type splits, but that only got me so far. Custom labels let me:
- Highlight bestsellers
- Flag high-margin items
- Tag seasonal products
Suddenly, I could see what was working and double down on it. My bidding got smarter. My reporting got clearer. My results improved.
Tactical Uses for Custom Labels
1. Bid Smarter
Isolate Top Performers
- Tag products with high ROAS to quickly spot your best performers.
- Raise bids on these items to capture more conversions.
- Focus your budget on what’s already working instead of guessing.
Cut Waste on Underperformers
- Label low-margin or underperforming SKUs so you can lower bids or exclude them.
- Prevent wasted spend on products that don’t deliver.
- Free up budget for higher-potential items.
Seasonal Pushes
- Use seasonal labels for products that spike during holidays or certain months.
- Instantly boost budgets for these items when demand hits.
- Stay agile and competitive without reworking your campaign structure.
2. Analyze Like a Pro
Custom Filters for Deeper Insights:
- Break down performance by margin, season, or promo status.
- Filter reports to see exactly what’s driving results.
- Uncover hidden trends that default reporting misses.
Side-by-Side Comparisons:
- Compare discounted items vs. full-priced ones at a glance.
- Make smarter decisions about pricing and promotions.
- See which groups are pulling their weight.
Faster Trend Spotting:
- Segmented data means you’ll notice shifts in performance sooner.
- Act on insights before your competitors do.
- Adjust campaigns quickly to capitalize on new trends.
3. Allocate Budget Intelligently
Prioritize High-Profit Segments:
- Direct more spend to products and segments with the highest margins.
- Avoid spreading your budget too thin across your entire catalog.
- Focus on what actually drives profit.
Shift Spend Where It Counts:
- Move budget to segments that consistently outperform.
- React fast to changes in performance.
- Keep your campaigns lean and efficient.
4. Keep Campaigns Organized
Simplify Catalog Management:
- Group products logically with custom labels.
- Keep large catalogs organized and easy to manage.
- Reduce manual work and confusion.
Layered Segmentation for More Control:
- Stack multiple labels—margin, season, bestseller status—for deeper segmentation.
- Fine-tune campaigns with more granular control.
- Adapt quickly as your catalog or strategy evolves.
Scalable as You Grow:
- Easily add new products to existing groups or create new segments.
- No need to rebuild your campaign structure as you expand.
- Maintain efficiency, no matter how big your catalog gets.
Danish Retailer Case Study
A client with a massive catalog (from hats to luxury watches) used custom labels for:
- Price tiers (“under_50”)
- Bestseller status (“best_seller: yes”)
- Seasonality (“seasonal: holiday”)
Result? They saw a 21% jump in conversion rate. Their Shopping campaigns could finally prioritize $300 watches over $15 hats, and push hats harder before winter. That’s the power of granular segmentation.
My Go-To Custom Label Strategies
Performance-Based Labels
Tag by ROAS or CPA
Start by labeling products based on how they actually perform. Use your own data—like ROAS or CPA—to create tags such as “high_roas,” “low_perf,” or “under_10_cpa.” This method is direct and keeps your focus on what’s working.
Align Bidding with Results
With these labels in place, you can quickly spot which products deserve more budget and which ones need to be scaled back. It’s a simple way to make sure your bidding matches real performance.
Price Buckets
Break your catalog into price ranges:
- Under $50
- $50–$150
- $150–$300
- Over $300
This classic approach makes it obvious which price points are driving the most sales and profit. Adjust bids or budgets for each bucket instead of treating your entire catalog the same.
Margin Labels
Not all revenue is created equal. Tag products by profit margin, not just price. This lets you put more budget behind high-margin items that actually help your bottom line. If you only look at revenue, you risk over-investing in products that don’t deliver real profit.
Seasonal Labels
Some products only sell well at certain times of year.
- Use labels like “seasonal_winter” or “seasonal_summer” to mark these items.
- When the season hits, you can instantly boost bids or budgets for those products—no need to rebuild your campaigns.
Promo/Sale Labels
Running a promotion? Flag those products with labels like “promo” or “on_sale.”
This makes it easy to track performance during the sale and quickly adjust your spend. If a promo is working, ramp up the budget. If not, pull back just as fast.
Implementation Tips
Static vs. Dynamic Labels
- Static labels: Manually assigned, rarely updated. Simple, but you’ll need to keep an eye on them as your catalog changes.
- Dynamic labels: Use automated rules that update based on real-time data like inventory, margin, or sales pace. This is a must for large or fast-changing catalogs.
Test and Iterate
Don’t just set your labels and forget them. Regularly review your logic and run A/B tests to see which segmentation—by price, margin, or performance—works best. This keeps your strategy sharp as your business evolves.
Automate Where Possible
- Use feed management tools to set up rules (for example, “IF price < $50 THEN custom_label_ = under_50”).
- Pull in data from your CRM or inventory systems to keep labels accurate and up to date.
Automation saves you time and reduces errors, so you can focus on strategy instead of manual busywork.
Implementation Tips
Static vs. Dynamic Labels
Manual vs. Automated Assignment
There are two main approaches to assigning custom labels. Static labels are manually assigned and rarely updated—simple, but they require regular maintenance as your catalog changes.
Scale with Dynamic Labeling
Dynamic labels, on the other hand, use automated rules to update based on real-time data like inventory, margin, or sales pace. Dynamic labeling is essential for large or fast-changing catalogs.
Test and Iterate
Regularly Review Your Logic
Don’t set your labeling strategy in stone. Review your logic regularly and run A/B tests to compare different segmentation methods—price, margin, or performance.
Keep Labels Relevant
This ongoing testing ensures your labels stay relevant and effective as your business evolves.
Automate Where Possible
Use Feed Management Tools
Manual labeling works for small catalogs, but it quickly becomes unmanageable as you scale. Use feed management tools to set up rules (for example, “IF price < $50 THEN custom_label_ = under_50”).
Integrate Data Sources
Integrate data from your CRM or inventory systems to keep labels accurate and up to date. Automation saves time and reduces errors, letting you focus on strategy instead of busywork.
Sample Custom Label Table
Here’s how a simple custom label setup might look:
You’d set up your own naming conventions and automate label assignment as much as possible.
Step-by-Step: Adding Custom Labels to Your Feed
- Identify what matters: Margin, season, bestseller status? Pick your top priorities.
- Plan your labels: Don’t overcomplicate. Start with a few, use clear names.
- Set up rules: Use your feed tool or do it manually for small catalogs.
- Upload and check: Make sure labels appear correctly in Merchant Center.
- Restructure campaigns: Segment by custom labels in Google Ads. Adjust bids and budgets accordingly.
- Monitor and optimize: Watch performance, tweak labels, and iterate.
Watch Out for These Pitfalls
- Too many labels: Complexity kills clarity. Less is more.
- Inconsistent definitions: Stick to your own rules (e.g., “high_margin” always means >50% margin).
- Neglecting updates: Seasonal and promo labels need regular review.
- Set-and-forget: Revisit your label strategy as your catalog and market evolve.
Custom labels aren’t just a technical detail—they’re the backbone of advanced Shopping campaign management. Use them right, and you’ll see sharper insights, smarter bidding, and better results.
Want to try the #1 AI Toolkit for SEO teams?
Our AI SEO assistants helps write and optimize everything - from descriptions and articles to product feeds - so they appeal to both customers and search engine algorithms. Try it now with a free trial→

![Product Disapprovals in Google Merchant Center [How to Fix Them]](https://cdn.prod.website-files.com/689da0db4875be384646a495/68a46dda8d01677982031ce4_product-disapprovals-in-merchant-center.jpg)